
Recognizing these signs early can help prevent more extensive and costly repairs or damage to your property. Below are the key indicators that your roof may need immediate replacement.
Shingles are a critical component of most roofing systems, particularly asphalt-based ones.
– Cracked or curled shingles: These can indicate aging or exposure to extreme weather.Missing shingles: Gaps in your roofing system leave your home vulnerable to water damage.Granule loss: Excess granules in gutters or near downspouts may suggest that shingles are deteriorating.
Water intrusion is one of the clearest indications that something is wrong with your roof.
– Water stains on ceilings or walls: Often yellowish-brown in color, these stains suggest leaks originating from the roof.
– Mold or mildew growth: A result of prolonged moisture exposure, often caused by an ineffective barrier against rain or snow.Dripping water during storms: This signifies a serious issue requiring immediate attention.
If parts of your roof appear uneven or droop inward, it could indicate structural problems due to water retention, aging materials, or poor installation practices. A sagging roof needs urgent evaluation by a professional roofer.
Common culprits include damaged underlayment or ventilation issues caused by inadequate airflow through attic spaces.
| Sign | Possible Cause | Action Needed |
| Missing shingles | Wind damage, aging materials | Replace missing shingles |
| Water stains indoors | Leaks through damaged areas | Repair leaks; check underlayment |
| Sagging sections | Structural issues from water pooling | Full inspection; potential replacement |
| Mold/mildew presence | Inadequate moisture control | Address leaks immediately |
Roofs have a finite lifespan depending on their material type: – Asphalt shinglestypically last between 20–30 years.Metal roofingcan endure for up to 50 years with proper maintenance.Wood shake roofs, though attractive, often require replacement after about 20 years. If your roof has exceeded its expected lifespan, it’s time to consider a replacement before significant issues arise.
Why Prompt Replacement Matters
Delaying necessary repairs or replacements can lead to: 1. Escalated repair costs due to extended damage. 2. Compromised structural integrity affecting safety. 3. Reduced property value and curb appeal.
Recognizing these warning signs early ensures you address potential problems promptly while protecting both your home’s value and safety standards long term.
Discover the Most Durable Roofing Materials with a Trusted Minneapolis MN Roofing Company
Choosing the right roofing material is one of the most important decisions homeowners and builders face when working on a roofing project. The durability of your roof not only impacts its longevity but also affects its ability to withstand weather conditions, prevent leaks, and maintain energy efficiency. Here is an overview of some of the most durable roofing materials available today.
Asphalt Shingles for Roofing Services Minneapolis MN
- Lifespan: 20–30 years (varies depending on quality)
- Widely used due to affordability.
- Available in a variety of colors and styles.
- Resistant to moderate wind, rain, and fire.
- Considerations:While cost-effective, asphalt shingles may not be as durable as other premium materials and can crack under extreme temperature changes.
- Lifespan:Up to 50 years or more with proper maintenance.
- Often made from steel, aluminum, or copper.
- Lightweight yet strong enough to resist wind, snow, and hail damage.
- Energy-efficient options with reflective coatings reduce cooling costs in warmer climates.
- Considerations:Higher upfront cost compared to asphalt shingles; however, long-term durability often offsets this expense.
| Type | Lifespan | Key Advantage |
| Steel | ~40 years | Cost-effective & strong |
| Aluminum | ~50 years | Rust-resistant & lightweight |
| Copper | ~70+ years | Premium aesthetic & long-lasting |
- Lifespan:Approximately 50–100 years depending on environmental conditions.
- Extremely resistant to fire and harsh weather conditions.
- Highly durable in areas exposed to heavy rains or strong winds.
- Available in various shapes and colors for architectural flexibility.
- Considerations:Heavier than other materials; structural reinforcement may be required for support.
- Lifespan:Can last over a century (100+ years).
- Natural stone material offers unmatched durability and timeless elegance.
- Excellent resistance to extreme temperature changes, fire, mold, and mildew growth.
- Considerations:One of the most expensive options; installation requires specialized skills.
Advantages of Durable Roofing Materials
Opting for high-quality roofing materials provides several benefits: 1. Reduced frequency of repairs or replacements over time, resulting in long-term savings. 2. Increased property value due to enhanced curb appeal and reliability. 3. Better protection against weather-related damage such as hailstorms or heavy snowfall.
Factors That Affect Durability
Even with the best materials available, certain factors can impact how long your roof lasts: 1. Proper installation – Ensuring professional workmanship during installation is critical for maximizing material performance. 2. Routine maintenance – Regular inspections help identify minor issues before they lead to significant damage. 3. Climate conditions – Some materials perform better in specific climates (e. g. , metal roofs excel in snowy regions due to their ability to shed snow).
Choosing the right roofing material involves weighing factors like budget, climate compatibility, aesthetic preferences, energy efficiency needs, and expected longevity. By investing in durable options now, homeowners can enjoy peace of mind knowing their roof will perform reliably for decades ahead without frequent repairs or costly replacements being necessary.
Step-by-Step Guide to Roof Installation with a Trusted Minneapolis MN Roofer
A roof installation or replacement is a significant investment that requires careful planning and execution. Understanding the process can help you prepare effectively, make informed decisions, and ensure the project runs smoothly. Below, we provide a detailed guide breaking down each step of the roof installation process.
Step 1: Initial Assessment and Inspection
Before starting any roof installation, thorough inspection and assessment are crucial.
- Assessment of Existing Roof:Roofers examine your current roof to identify damage, weak spots, or structural issues.
- Measurement and Evaluation:They take precise measurements to calculate material requirements and costs.
- Identifying Challenges:Issues like poor insulation, water damage, or improper ventilation are noted for resolution during installation.
This initial phase sets the foundation for a seamless project by addressing any underlying problems beforehand.
Step 2: Choosing Roofing Materials
The next step is selecting the materials best suited for your home’s style, climate conditions, and budget.
| Roofing Material | Durability (Years) | Key Features |
| Asphalt Shingles | 20-30 | Cost-effective and versatile |
| Metal Roofing | 40-70 | Durable with modern aesthetics |
| Clay or Concrete Tiles | 50+ | Long-lasting but heavier |
| Slate | 50+ | Premium look with high durability |
When choosing materials, consider factors such as energy efficiency, maintenance needs, resistance to natural elements like wind or hail, and warranty coverage offered by manufacturers.
Step 3: Removing Old Roofing
Before installing a new roof, removing the old one is essential in most cases.
- Stripping away existing shingles or tiles.
- Inspecting decking for damage such as rot or warping.
- Preparing a clean surface for the new materials.
Skipping this step can lead to poor adhesion of new roofing materials and potential structural issues over time.
Step 4: Installing Underlayment
Underlayment serves as an added layer of protection against moisture.
- A waterproof barrier (such as synthetic underlayment) is installed directly onto the decking.
- Flashing is applied in areas prone to leaks, such as around chimneys or vents.
- Ice-and-water shields may be added in regions with harsh winters to prevent ice dams from forming.
This layer ensures additional defense against weather elements that could compromise your roof’s longevity.
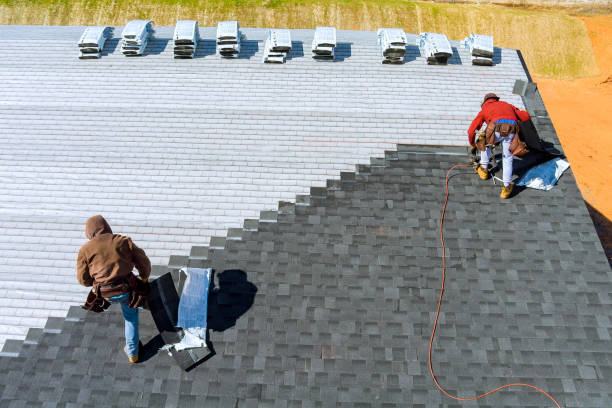
Step 5: Installing Shingles or Other Materials
- Roofers begin laying down shingles or other chosen materials following manufacturer guidelines.
- Proper alignment techniques are used to ensure consistent spacing and an aesthetically pleasing appearance.
- Edge trimming ensures no overhangs that could weaken over time due to exposure.
Attention to detail during this phase guarantees both functionality and curb appeal for your home.
Step 6: Final Inspection
- A thorough inspection ensures all aspects meet safety standards.
- Gutters are checked for proper alignment with newly added roofing components.
- Cleanup includes removing debris from your property so it looks pristine post-project.
The final walkthrough allows you to address any questions before signing off on completion paperwork with your contractor.
Understanding these steps provides homeowners clarity on what happens during roof installations while highlighting key decision points throughout the process. Choosing experienced professionals ensures quality workmanship while giving peace of mind about protecting one of your home’s most critical assets—the roof above you.
Understanding the Roof Installation Process from Start to Finish
The roof installation process is one of the most critical aspects of maintaining a safe and functional home. Whether you’re replacing an old roof or installing a new one, understanding the steps involved can ensure the project runs smoothly and efficiently. Below is a comprehensive breakdown of the key stages in roof installation.
Initial Planning and Preparation
Before any work begins, preparation is essential to a successful roofing project.
– Inspection:A professional roofer will inspect your current roof (if applicable) to assess its condition and identify specific challenges, such as structural issues or water damage.
– Material Selection:Based on your budget and climate, you’ll choose roofing materials such as asphalt shingles, metal panels, or tiles. Each material offers different benefits in terms of durability, cost, and aesthetics.
– Budget Estimation:The contractor will provide you with a detailed estimate that includes labor costs, material expenses, and any additional fees for permits or cleanup.
Removal of Old Roofing Material
If you’re replacing an existing roof, the next step involves removing old materials:
– Stripping Off Old Layers:The existing shingles or roofing materials are removed down to the decking. This ensures that there’s a solid base for the new installation.
– Debris Cleanup:All debris is carefully removed from your property to maintain safety and minimize disruption.
Inspection of Roof Decking
Once the old materials are stripped away, it’s time to examine the roof decking:
– Structural Integrity Check:The contractor will inspect for rotted or damaged decking that needs repair or replacement before proceeding. Damaged areas can compromise the lifespan of your new roof if left unaddressed.
– Moisture Barrier Application:A waterproof underlayment or moisture barrier may be installed over the decking to prevent leaks in vulnerable areas.
Installing Roofing Materials
With a sound foundation prepared, contractors proceed with installing your chosen roofing material:
1.Laying Starter Strips:Starter strips are placed along edges to create a clean line and improve adherence for shingles or tiles.
2.Shingle/Tile Placement:Shingles or tiles are arranged systematically from bottom to top in overlapping patterns to ensure proper drainage and protection against water infiltration. 3.Sealing Flashing Areas:Flashing is installed around chimneys, vents, valleys, and other penetrations to prevent leaks in these areas. 4.Ridge Cap Installation:Ridge caps seal off ridges at the peak of your roof while providing additional ventilation if needed.
Final Touches and Cleanup
Once all roofing materials are installed:
– Quality Inspection:The contractor performs a thorough inspection of their work to confirm that everything meets quality standards.Site Cleanup:Any remaining debris is removed from your property.Warranty Documentation Provided:Most reputable roofing companies offer warranties on both materials and workmanship.
| Steps | Tasks Included | Purpose |
| Preparation | Inspection & Material Selection | Establishes scope & budget |
| Removal | Stripping Old Layers | Clears space for new installation |
| Decking Check | Repairs & Moisture Barrier Installation | Improves longevity & performance |
| Material Install | Laying Shingles/Tiles & Sealing Flashing | Ensures weather resistance |
| Final Touches | Quality Check & Cleanup | Guarantees satisfaction |
Understanding these steps will empower you as a homeowner to communicate effectively with contractors during your project while ensuring every detail receives proper attention throughout its execution process.
Planning and Permits for a Successful Roof Installation Project
Proper planning and obtaining necessary permits are essential steps in ensuring a successful roof installation project. Homeowners often overlook these aspects, but neglecting them can lead to costly delays, legal issues, or subpar results. Below, we’ll break down the key components of planning and securing permits for your roofing project.
Why Planning is Crucial
Every successful roofing project begins with detailed planning. This phase ensures that the timeline, budget, materials, and labor are all accounted for.
- Budget Management: Planning allows homeowners to estimate costs accurately by factoring in material prices, labor fees, and unexpected expenses like repairs to underlying structures.
- Timeline Efficiency: A well-prepared schedule minimizes potential delays caused by weather or material availability.
- Material Selection: Researching and choosing the right roofing materials ensures durability and aesthetic appeal.
- Avoiding Last-Minute Changes: Proper preparation reduces the chances of unforeseen complications during installation.
The Importance of Permits
In most locations, roof replacement or installation projects require obtaining permits from local building authorities. Securing these permits is often mandatory for compliance with building codes and safety standards. Failing to acquire them can result in fines or even being required to redo the work.
- Legal Requirements: Permits ensure your project complies with local zoning laws and regulations.
- Safety Assurance: Building inspectors check that the work meets established safety standards.
- Property Value Protection: A properly permitted roof installation adds value to your home when selling it.
Steps to Obtain Roofing Permits
- Reach out to your city or county’s building department to understand specific requirements for roofing projects.
- Provide details about your project, including plans or blueprints, contractor information (if applicable), material specifications, and estimated timelines.
- Fees vary depending on your location but typically range between $150-$500 for residential roofing permits.
- Some jurisdictions require inspections at different stages of the roofing process (e. g. , before tear-off begins or after underlayment installation).
- After completing the project, an inspector may review the work before issuing final approval.
Common Challenges with Planning and Permitting
Homeowners sometimes encounter obstacles during this process.
| Challenge | Solution |
| Unclear Permit Requirements | Consult professionals like contractors who are familiar with local rules. |
| Delays in Approval | Submit applications early to account for processing times by authorities. |
| Unlicensed Contractors | Always verify that contractors have valid licenses before hiring them. |
Professional Assistance is Key
For complex projects or those unfamiliar with construction protocols, working with professional roofing contractors can streamline both planning and permitting processes. Experienced contractors often handle permit applications on behalf of homeowners while ensuring adherence to codes.
By prioritizing careful preparation and compliance with local regulations through proper permits, you set a solid foundation for a smooth roof replacement experience—protecting both your investment and peace of mind over time.
- Maximize Efficiency: When a Minneapolis MN Roofer Recommends Replacing Your Roof
- Step-by-Step Guide for Homeowners Hiring a Roofing Contractor Minneapolis MN
- Step Comprehensive Roof Replacement Guide for Homeowners by a Minneapolis MN Roofing Company
- 11 Step Guide to Successfully Replacing Your Roof with Help from a Minneapolis MN Roofer
- Signs That You Need a Roofing Contractor Minneapolis MN for an Urgent Roof Replacement
- Step-by-Step Guide to Roofing Services Minneapolis MN for Homeowners
- When You Need Planning Permission for Roofing Projects: Advice from a Minneapolis MN Roofer