
Replacing your roof can seem like a daunting task, but with the right approach and preparation, it is manageable for a skilled homeowner. Below is an 11-step guide to help you navigate this process effectively while ensuring safety and durability.
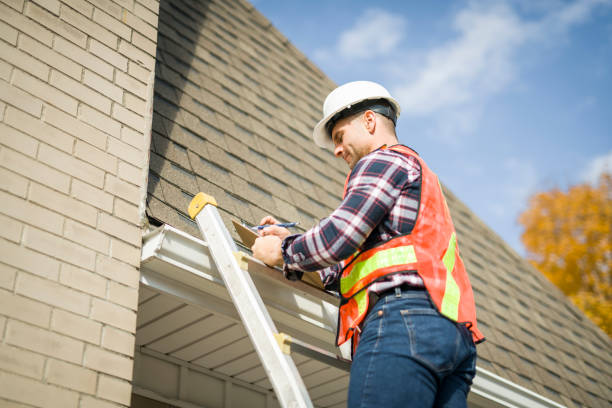
1. Assess the Need for Replacement
Begin by inspecting your roof for common signs of damage:
– Missing or damaged shingles
– Water stains on ceilings or attic walls
– Leaking or sagging areas
If your roof is over 20 years old or exhibits significant wear, replacement may be necessary.
2. Obtain Necessary Permits
Check with local authorities regarding building codes and permits. Many regions require homeowners to acquire permits before beginning major roofing projects.
3. Choose Your Roofing Material
Select a material suitable for your home’s style, budget, and climate. Common options include:
| Material Type | Durability | Cost (per sq ft) | Maintenance | Sustainability | |——————-|—————–|——————|—————-|—————-| | Asphalt Shingles | 15-30 years | Low | Moderate | Medium | | Metal | 40-70 years | Moderate | Low | High | | Tile | Up to 100 years | High | Low | High |
4. Gather the Necessary Tools and Materials
Ensure you have everything needed before starting:
Tools: Ladder, roofing nails, nail gun, pry bar, utility knife, chalk line, safety harness.
Materials: Underlayment, shingles (or chosen material), flashing, sealant.
5. Prioritize Safety Measures
Working on a roof poses risks. Follow these guidelines:
– Use a sturdy ladder secured at ground level. – Wear non-slip footwear. – Utilize a harness connected to an anchor point. – Avoid working alone or in adverse weather conditions.
6. Remove Old Roofing Materials
Carefully strip away all existing shingles or materials using a pry bar and shovel. Be sure to dispose of debris responsibly by renting a dumpster or contacting local waste management services.
7. Inspect the Roof Decking
Examine the decking for rot or damage before proceeding further:
Replace any compromised sections with new plywood to ensure structural integrity.
8. Install Underlayment and Ice/Water Shield
Lay down underlayment across the entire roof surface as protection against moisture infiltration: 1. Begin at the eaves and work upward in overlapping rows. 2. For colder climates prone to ice dams, install an ice-and-water shield beneath the underlayment near edges.
9. Secure Flashing Around Openings
Install metal flashing around chimneys, skylights, vents, and valleys: This step prevents water seepage into vulnerable areas and extends your roof’s lifespan.
10. Install New Roofing Material
Start applying shingles (or your chosen material) from the bottom edge upward while following manufacturer instructions: – Properly align each layer using chalk lines. – Secure every piece firmly with nails spaced according to guidelines. For alternatives like metal roofs or tiles, cutting pieces precisely is key during installation.
11. Perform Final Inspection
Once installation is complete: 1. Walk around your property looking for misplaced nails or remaining debris. 2. Ensure all flashing is tightly sealed. 3. Double-check alignment of roofing materials for uniformity.
Replacing your roof yourself requires patience and attention to detail but can be both cost-effective and rewarding when executed properly.
Key Materials and Tools Every Roofing Contractor Minneapolis MN Relies On for Roof Replacements
Replacing a roof is a significant undertaking that requires both careful planning and the right set of tools and materials. Ensuring you have all the essentials before starting the project can save time, reduce stress, and improve the overall quality of your work. Below, we’ve outlined the key materials and tools necessary for a smooth roof replacement process.
Materials Required
- Roofing Shingles: Asphalt shingles are the most popular choice due to their affordability and durability. Alternatively, consider metal panels, wood shakes, or slate shingles based on your preferences and budget.
- Roofing Underlayment: Acts as an additional layer of protection between your roof deck and shingles, helping to prevent moisture intrusion.
- Roof Decking (if needed): Ensure you have plywood or OSB (oriented strand board) sheets in case parts of the existing deck need replacement.
- Flashing: Metal strips used around chimneys, vents, valleys, and edges to prevent water leaks.
- Roofing Nails: Galvanized nails are recommended because they resist rusting over time.
- Drip Edge: A metal strip installed along roof edges to direct water into gutters.
- Ice & Water Shield: Protects vulnerable areas such as valleys or roof edges from ice dams or excess moisture.
Tools You’ll Need
- Hammer or Nail Gun: For securing shingles with roofing nails quickly and efficiently.
- Utility Knife: Essential for cutting shingles and underlayment material accurately.
- Pry Bar/Crowbar: To remove old shingles, nails, or damaged decking material with ease.
- Measuring Tape: Ensures accurate measurements of your roof area for precise cutting and placement.
- Ladder/Sturdy Scaffolding: Provides safe access to different parts of your roof while working at height.
- Chalk Line Tool: Helps mark straight lines when aligning shingles during installation.
- Hard hat
- Non-slip shoes
- Safety harness
- Broom or Roof Rake: To clear debris from the surface before starting work.
Optional Tools for Added Efficiency
- Roofing shovel for quicker removal of old shingles
- Circular saw if extensive decking repairs are required
- Magnetic nail sweeper to pick up discarded nails from the ground
| Tool/Material | Purpose | Mandatory/Optional |
| Roofing Shingles | Provides weatherproof covering | Mandatory |
| Underlayment | Adds an extra layer of protection | Mandatory |
| Pry Bar | Removes old roofing material | Mandatory |
| Nail Gun | Speeds up nail installation | Optional |
| Ice & Water Shield | Prevents leaks in vulnerable areas | Mandatory |
Tips for Preparing Your Tools Ahead of Time
- Organize all tools in advance to avoid delays during installation day.
- Test power tools like nail guns or saws beforehand to ensure they’re functioning properly.
- Inspect safety equipment such as harnesses carefully—your safety should always be prioritized.
By gathering all essential materials and tools ahead of time, you’ll set yourself up for success when replacing your roof as a handy homeowner. Remember that preparation is key to achieving professional-level results!
Step-by-Step Guide to Roofing Services Minneapolis MN for a Seamless Roof Replacement
Replacing your roof can be a daunting task, but with the right process and preparation, it can be efficiently managed even by a handy homeowner. By breaking the project into clear, manageable steps, you’ll ensure your roof replacement is completed safely and effectively.
Step 1: Assess the Current Condition of Your Roof
Before you begin replacing your roof, conduct a thorough inspection to evaluate its current condition. Look for:
– Missing, curling, or cracked shingles
– Signs of leaks or water damage in the attic or ceilings
– Sagging areas that could indicate structural issues
– The presence of mold, algae, or moss growth
Document damaged areas with photos to help guide the replacement process.
Step 2: Plan and Obtain Permits
Check local building codes to determine if permits are required for roof replacement in your area. Having all necessary paperwork ensures you’re complying with laws and avoiding potential penalties.
Step 3: Gather Essential Materials and Tools
Materials:
– Roofing shingles (asphalt or chosen alternative)
– Underlayment (felt paper or synthetic options)
– Drip edge material
– Flashing components (metal pieces for valleys, chimneys, etc.)
Tools:
– Pry bar or roofing shovel for removing old shingles
– Roofing nail gun and nails
– Tape measure and utility knife for precision cuts
– Safety equipment such as gloves, harnesses, and goggles
Step 4: Remove Old Roofing Materials
Carefully strip away existing shingles using a pry bar or roofing shovel. Be sure to work section by section to maintain control over debris removal. Dispose of old materials responsibly by renting a dumpster or arranging proper waste management services.
Step 5: Inspect and Prepare Roof Decking
Once the old materials are removed, examine the roof decking for signs of rot or weak spots. Replace any damaged plywood sheathing before proceeding further. Use this step to ensure a solid foundation for new roofing materials.
Step 6: Install Drip Edge Along Eaves
Install drip edge flashing along the eaves to protect against water infiltration beneath your underlayment.
Step 7: Apply Underlayment
Roll out waterproof underlayment across your decking surface. Secure it with staples or roofing nails as per manufacturer instructions. Proper underlayment acts as an additional barrier against moisture penetration.
Step 8: Position Flashing Pieces
Place flashing around chimneys, vents, valleys, and other vulnerable points where water might seep through seams in shingles.
| Flashing Area | Recommended Material | Purpose |
| Chimneys | Aluminum/Copper | Prevent water from pooling at base |
| Valleys | Galvanized Steel | Diverts water flow effectively |
| Skylights | Rubber/Metal | Ensures watertight seal |
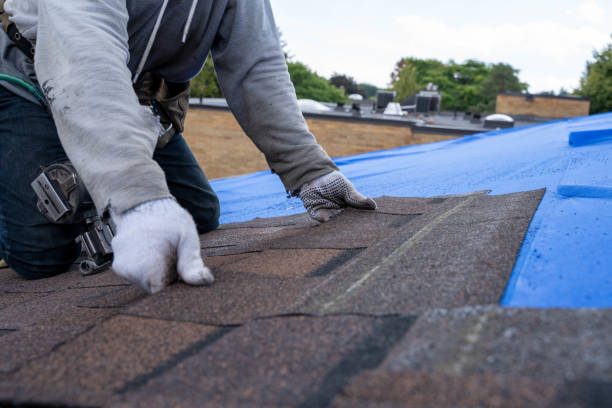
Step 9: Lay Down Roofing Shingles
Follow manufacturer guidelines to install shingles row by row. Start from the bottom edge of your roofline and move upward while overlapping each layer adequately—this overlap prevents water from seeping between gaps during rainfall.
Pro Tip: Use chalk lines across your decking surface as guides to maintain consistent alignment during installation.
Step 10: Install Ridge Cap Shingles
Cap off adjacent sides at ridges using ridge cap shingles designed specifically for this purpose—they provide both aesthetic appeal and enhanced protection against high winds.
Step 11: Final Inspection
After completing installation: 1. Check shingle alignment one final time. 2. Ensure nails are securely driven without overpenetrating. 3. Confirm flashing is sealed tightly around all joints. 4. Clear gutters of debris caused during construction work.
By following these steps systematically, you’ll achieve professional-quality results while extending the lifespan of your home’s most critical defense—the roof itself.
How to Properly Inspect and Repair Your Roof Deck Before Replacement
Proper inspection and repair of your roof deck are critical steps in the roof replacement process. Ignoring these steps can lead to structural issues, leaks, and costly future repairs. Whether you’re a DIY enthusiast or a homeowner who wants to oversee the process thoroughly, understanding how to assess and mend your roof deck is essential.
Why Inspecting the Roof Deck Matters
The roof deck serves as the foundation for your roofing system. It supports shingles, underlayment, and other components, ensuring they perform effectively. Over time, exposure to moisture, pests, or structural wear can weaken this layer. Failing to address damage before installing a new roof could shorten its lifespan and compromise safety.
Some key risks of ignoring roof deck repair: – Water Damage: Hidden leaks can rot wood over time. – Mold Growth: Damaged areas might foster mold that spreads through the structure. – Structural Weakness: A compromised deck may reduce the overall load-bearing capacity of your roof.
Tools Needed for Roof Deck Inspection
Before starting the inspection process, gather these essential tools: – Flashlight (for spotting hidden damage) – Pry bar (to lift shingles if necessary) – Hammer or crowbar (for removing nails) – Measuring tape – Marker or chalk (to highlight areas of concern) – Safety gear: gloves, sturdy boots with grip soles, and protective eyewear
Using appropriate safety precautions while working at heights is crucial.
Steps for Inspecting Your Roof Deck
- Carefully strip off old shingles and underlayment to expose the deck beneath.
- Use a pry bar or roofing shovel to loosen nails without damaging underlying layers.
- Look for warped or sagging areas that indicate water damage or structural issues.
- Check for discoloration on wood panels — dark spots often signal rot.
- Inspect nail holes; oversized holes may compromise integrity.
- Gently tap sections of decking with a hammer handle.
- Rotten wood will produce hollow sounds compared to solid parts.
- Visit your attic during daylight hours.
- Look for sunlight streaming through cracks in the decking or noticeable water stains on rafters.
Repairing Damaged Areas
Small Cracks or Holes: – Use wood filler designed for outdoor applications. – Sand down patched areas once dry to ensure smoothness.
Rotten Sections: 1. Cut out damaged pieces using a saw. 2. Replace them with new plywood panels of similar thickness. 3. Secure fresh panels using galvanized nails spaced every 6 inches along edges and 12 inches within interior sections.
Sagging Areas: – Reinforce weak spots by installing additional supports underneath beams where necessary.
Tips for Preventing Future Damage
To ensure long-term durability after replacing your roof: 1. Install proper ventilation systems — reducing moisture buildup extends decking life. 2. Use high-quality underlayment designed to provide an additional barrier against water intrusion. 3. Schedule periodic professional inspections even after completing replacement work.
By paying close attention during this phase of roof replacement, you safeguard both your investment and home structure from potential hazards down the road.
Installing Roofing Shingles: A Complete Guide to Asphalt and Alternative Options
Properly installing roofing shingles is a critical step in ensuring your roof’s durability, functionality, and aesthetic appeal. Whether you’re opting for traditional asphalt shingles or exploring alternative materials like metal, slate, or wood, understanding the installation process and its nuances is essential for a successful outcome.
Types of Roofing Shingles
| Shingle Type | Benefits | Considerations |
| Asphalt Shingles | Affordable, versatile, easy to install | Moderate lifespan (15-30 years), can fade over time |
| Metal Shingles | Durable, eco-friendly, fire-resistant | Higher upfront cost |
| Slate Shingles | Long-lasting (50+ years), natural appearance | Heavier material requiring strong roof structure |
| Wood Shingles/Shakes | Natural look, good insulation properties | Prone to rot in wet climates; needs maintenance |
| Composite Shingles | Lightweight, customizable designs | Slightly more expensive than asphalt |
Preparing for Installation
- Inspect the Roof Deck: Ensure that the decking underneath is free from rot or damage.
- Install Underlayment: Lay down roofing underlayment or felt paper as a moisture barrier.
- Add Drip Edge: Install drip edge along the eaves and rake edges to prevent water infiltration.
- Mark Chalk Lines: Use chalk lines to create straight guidelines for laying shingles.
Step-by-Step Guide to Installing Asphalt Shingles
- Lay starter strip shingles at the base of your roof (along the eaves). This layer helps prevent water penetration beneath seams.
- Begin at one corner and work horizontally across the roofline.
- Overlap each shingle slightly according to manufacturer instructions.
- Stagger each row by cutting off a portion of the first shingle in alternating rows. This prevents aligning vertical seams.
- Use roofing nails at designated nailing points on each shingle.
- Avoid overdriving nails into the material.
- Ridge caps are specially designed shingles that cover ridge lines.
- Install these last to seal off vulnerable areas at roof peaks.
Tips for Installing Alternative Materials
- Metal: Use screws instead of nails, and include a waterproof membrane underneath for added protection against leaks.
- Slate: Ensure your structure can support its weight before installation; always work with precision when cutting slate pieces.
- Wood: Allow wood shakes to acclimate before installing; use stainless steel fasteners to prevent rusting over time.
Common Mistakes to Avoid During Installation
- Failing to align shingles properly along chalk lines can result in uneven patterns and ineffective sealing.
- Skipping underlayment may lead to moisture damage down the line.
- Using incorrect nail placement can cause premature loosening or leaks during high winds.
Installing roofing shingles requires careful attention to detail but offers an opportunity for homeowners or contractors to enhance both function and appearance on any property effectively. With proper preparation and execution tailored to your chosen material type, you can achieve lasting results that protect your home efficiently while looking great year after year.
Ensuring Proper Ventilation and Flashing with a Trusted Minneapolis MN Roofing Company
When undertaking a roof replacement project, many homeowners focus on selecting the right roofing materials or ensuring proper installation techniques. However, two critical components—ventilation and flashing—are often overlooked, despite their significant impact on the longevity and performance of your roof. Proper ventilation and flashing not only protect your home from moisture damage but also contribute to energy efficiency and comfort.
Why Proper Ventilation Matters
Roof ventilation involves creating a balanced airflow between intake vents (located at the eaves or soffits) and exhaust vents (typically installed near the ridge). This system helps regulate temperature and moisture levels within your attic space.
- Preventing Moisture Buildup: Excess moisture trapped in an attic can lead to mold growth, wood rot, and insulation damage.
- Extending Roof Lifespan: Overheating in the attic can cause shingles to deteriorate prematurely.
- Improving Energy Efficiency: Adequate airflow reduces the strain on HVAC systems by keeping attics cooler during summer months.
- Reducing Ice Dam Formation: In colder climates, proper ventilation minimizes snow melting unevenly on roofs, which helps prevent ice dams from forming.
| Type of Vent | Description |
| Intake Vents | Allow cool air to enter into attic spaces through eaves or soffits. |
| Exhaust Vents | Release warm air from the attic through ridges or gable ends. |
To ensure proper ventilation during a roof replacement, consult local building codes for minimum requirements or work with a professional roofer who can calculate your home’s specific needs.
The Role of Flashing in Roof Integrity
Flashing consists of thin pieces of metal (e.g., aluminum or galvanized steel) used to direct water away from vulnerable areas of your roof. It is commonly installed around chimneys, valleys, skylights, vents, and other protrusions where leaks are likely to occur.
- Water can seep into gaps between roofing materials.
- Leaks might develop over time due to wear-and-tear or extreme weather events.
- Damage may spread to underlying structures like the roof deck or interior walls.
Types of Roof Flashing
- Step Flashing: Used along walls that intersect with roofs; installed in overlapping layers for maximum protection.
- Drip Edge Flashing: Installed along eaves to guide water into gutters rather than under shingles.
- Valley Flashing: Protects low points where two roof slopes meet.
- Chimney Flashing: Shields areas where chimneys connect with roofing materials.
Tips for Ensuring Proper Installation
- Choose Quality Materials: Use durable flashing materials resistant to rust and corrosion.
- Check for Compatibility: Ensure flashing matches your chosen roofing material (e.g., asphalt shingles).
- Seal Joints Correctly: Apply waterproof sealants at joints or overlaps for added protection against leaks.
- Inspect Regularly: Conduct routine inspections after severe weather events to identify potential damage early.
Combining Ventilation and Flashing for Success
Ventilation ensures your home stays energy-efficient and free from excess moisture buildup, while flashing protects against water intrusion at critical points on your roof’s surface. Together, these elements form a comprehensive defense system that enhances both structural integrity and aesthetic appeal.
For handy homeowners replacing their roofs themselves, dedicating time to understand proper ventilation layout plans alongside meticulous attention toward applying appropriate flashings will elevate outcomes dramatically ensuring years worth peace-of-mind maintenance wise.
- Maximize Efficiency: When a Minneapolis MN Roofer Recommends Replacing Your Roof
- Step-by-Step Guide for Homeowners Hiring a Roofing Contractor Minneapolis MN
- Step Comprehensive Roof Replacement Guide for Homeowners by a Minneapolis MN Roofing Company
- 11 Step Guide to Successfully Replacing Your Roof with Help from a Minneapolis MN Roofer
- Signs That You Need a Roofing Contractor Minneapolis MN for an Urgent Roof Replacement
- Step-by-Step Guide to Roofing Services Minneapolis MN for Homeowners
- When You Need Planning Permission for Roofing Projects: Advice from a Minneapolis MN Roofer