Replacing a roof is a significant investment and a critical project for maintaining the structural integrity and value of your home. A well-organized, step-by-step approach ensures the process is efficient, effective, and results in a durable roof that lasts for years. Below is a comprehensive 11-step guide to help homeowners navigate roof replacement from start to finish.
Before starting, assess the condition of your current roof. Look for signs such as leaks, missing shingles, sagging areas, or mold growth. This inspection helps determine whether repair or full replacement is needed.
Signs Your Roof Needs Replacement:
– Shingles are curling or cracking
– Roof age exceeds 20 years (for asphalt shingles)
– Persistent leaks despite repairs
– Granule loss on shingles
Selecting the right roofing material impacts durability, aesthetics, and maintenance needs. Consider factors like climate, budget, and architectural style when making your choice.
Popular Roofing Material Options:| Material | Durability (Years) | Cost Range (per sq. ft.
Decide whether you want to work with licensed contractors or attempt a DIY approach if you are experienced with roofing projects. Keep in mind that professional installers provide warranties and expertise.
Check local building regulations to determine if permits are required for roof replacement in your area. Failure to comply with code requirements can lead to fines or complications during resale.
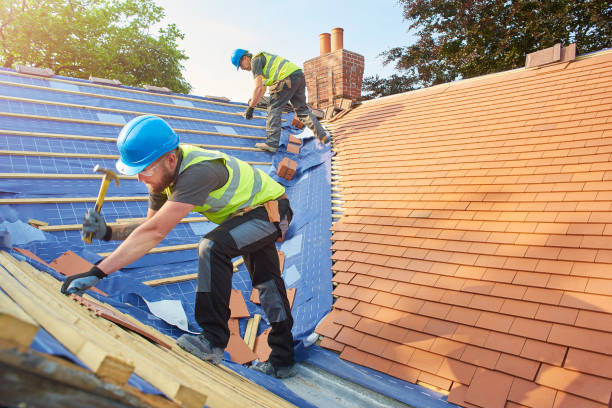
Stripping off existing shingles is crucial to ensure proper installation of new materials. Use tools like roofing shovels or scrapers for this task.
Tip:Protect landscaping around your home by covering plants with tarps before starting removal.
Examine the underlying decking after removing old materials for signs of rot or damage. Replace compromised sections to provide a sturdy base for new shingles.
Lay down roofing underlayment to create an additional layer of water resistance beneath your shingles. Choose options such as synthetic underlayment or felt paper based on budget and climate.
Benefits of Underlayment:
– Prevents moisture infiltration
– Adds insulation value
– Enhances overall performance of roofing materials
Install flashing around chimneys, skylights, valleys, and other areas prone to water seepage to improve waterproofing.
Begin installing shingles (or another material) at the lower edge of your roof, working upward in overlapping layers according to manufacturer guidelines.
Key Tips During Installation:
– Align shingle rows evenly for aesthetic consistency
– Use nails designed specifically for roofing applications
– Avoid overdriving nails into the material
Adequate attic ventilation prevents issues like excessive heat buildup or moisture accumulation that can compromise both comfort and structural integrity.
Common Ventilation Components: – Ridge vents
– Soffit vents
Carefully examine all completed work before considering it finished using a checklist that includes verifying flashing placement, ensuring even shingle rows, and checking overall cleanliness at the job site.
Having these steps clearly outlined provides homeowners with clarity throughout what might otherwise feel like an overwhelming project while helping ensure long-term durability from their investment into new roofing systems.
Step-by-Step Guide for Hiring a Minneapolis MN Roofer to Replace Your Roof
Replacing a roof is a significant project that requires proper planning, the right tools, and careful execution. This step-by-step guide provides homeowners with a clear roadmap to ensure the replacement process is efficient and results in a durable, long-lasting roof.
Before starting, assess the condition of your existing roof. Determine if you need a full replacement or partial repairs.
– Age of the roof
– Extent of damage (e. g.
– Type of roofing material currently installed
Create a timeline for your project and set a realistic budget based on material costs and labor requirements.
Check with your local building authority to confirm whether permits are required for your roofing project. Ensuring compliance with regulations helps avoid fines or complications later on.
Start by stripping away old shingles or tiles using tools like roofing shovels or pry bars. Collect debris in a dumpster or tarp to keep your workspace clean and safe.
Key tips:
– Wear safety equipment such as gloves, goggles, and sturdy boots.
– Inspect the underlayment for water damage during this stage.
Once the old roofing material is removed, closely examine the roof deck for issues like rot or structural weakness. – Replace damaged plywood panels. – Sand rough areas to create an even surface for new materials.
If necessary, install additional support beams to strengthen weak areas of the decking.
A drip edge prevents water from seeping under shingles at roof edges: 1. Nail drip edge along eaves, ensuring it runs flush with fascia boards. 2. Install another layer along gable ends after adding underlayment.
Underlayment acts as an additional moisture barrier beneath shingles: 1. Roll out waterproof membrane starting from eaves toward ridges. 2. Overlap sections by at least 6 inches to prevent gaps. 3. Secure underlayment with roofing nails spaced about every 12 inches.
For extra protection in areas prone to ice dams or heavy rainfall:
– Use self-adhering ice-and-water shield around valleys and penetrations like chimneys.
Proper shingle installation ensures durability:
– Begin at bottom edges using starter shingles designed with adhesive strips for wind resistance. – Lay regular shingles row by row; stagger seams between rows to minimize leaks. – Nail each shingle securely per manufacturer recommendations (usually four nails per standard-sized shingle).
For metal roofs: | Step | Description | |——|————-| | Cut Panels | Trim metal panels according to dimensions specified in your plan | | Secure Panels | Fasten panels using screws equipped w/ rubber washers |
Step-by-Step Guide from a Roofing Contractor Minneapolis MN to Effectively Replace Your Roof
Replacing a roof is a significant undertaking that requires careful planning, precision, and proper execution. Below is a step-by-step process to help homeowners and roofing professionals ensure the roof replacement is carried out effectively and efficiently. Following these steps can help prolong the life of your new roof while avoiding costly mistakes.
Step 1: Assess the Condition of Your Current Roof
Before beginning any work, inspect the current condition of your roof to determine whether repairs or a full replacement are necessary.
– Broken or missing shingles
– Sagging areas on the roof deck
– Leaks or water damage inside your home
– Cracked flashing or improperly sealed vents
If you’re unsure about what to look for, consider hiring a roofing professional for an initial assessment.
Step 2: Obtain Necessary Permits and Materials
Proper permits are often required for roof replacements, depending on local building codes. Be sure to check with your local authorities before starting the project.
– Roofing shingles (asphalt, metal, or other types)
– Underlayment (felt paper or synthetic options)
– Roofing nails and staples
– Flashing materials (aluminum or galvanized steel)
Having all necessary tools like hammers, utility knives, and roofing nailers ready in advance is equally important.
Step 3: Remove Old Roofing Materials
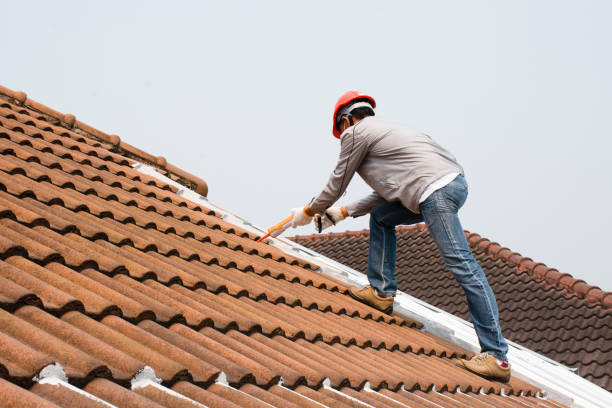
Safely remove the existing shingles and underlayment from your roof. Use tools like shingle scrapers or pry bars to make this process efficient.
– Work section by section to avoid overloading your roof structure with debris.
– Dispose of old materials responsibly by renting a dumpster or recycling whenever possible.
Ensure the entire surface is clean before moving forward.
Step 4: Inspect and Prepare the Roof Deck
With all old materials removed, inspect the roof deck thoroughly for rot or damage.
1. Replacing damaged plywood sheathing with new panels if necessary. 2. Tightening loose nails that might compromise structural integrity. 3. Sanding rough areas on wood surfaces to create an even finish.
A sound deck will provide a sturdy foundation for underlayment and shingles.
Step 5: Install Roofing Underlayment
Install an underlayment layer over the entire surface of your prepared deck for waterproofing purposes.
Begin installation at one edge of the roof while overlapping each row by about 6 inches to prevent water infiltration.
Step 6: Lay Down Starter Shingles
Starter shingles form a protective barrier at eaves and rakes against wind-driven rain: 1. Cut regular shingles into halves if starter strips are unavailable. 2. Align starter pieces along eaves using chalk lines as guides. 3. Nail them securely into place without leaving gaps.
Starter strips ensure proper alignment when laying subsequent rows of shingles.
Step 7: Install Main Shingles
Lay main rows starting from bottom edges toward peak points of slopes: * Use staggered patterns following manufacturer guidelines. * Overlap adjacent pieces slightly based on specific product recommendations. * Secure every shingle using recommended fasteners spaced evenly across widths.
Taking time during placement ensures visual appeal alongside performance benefits long-term.
Step 8: Add Flashing Around Key Areas
Install flashing around chimneys, skylights, valleys & vent pipes: * Use rust-resistant metals sealed tightly around protrusion bases. * Double-check compatibility between flashing dimensions versus gap sizes needing coverage.
Properly installed flashing prevents leaks where shingles alone cannot suffice adequately against water intrusion risks unique per area layout specifics faced regionally globally alike overall alike contexts too globally more
Essential Tips for Roofing Services Minneapolis MN: Inspecting and Repairing Your Roof Deck Before New Shingles
Thoroughly inspecting and repairing your roof deck before installing new shingles is a crucial step in ensuring the longevity and effectiveness of your roofing system. The roof deck acts as the foundational layer that supports shingles, so it must be structurally sound and free from damage. Below is a detailed guide on how to inspect and repair your roof deck properly.
Why Roof Deck Inspection Is Important
- Prevents Future Damage: A compromised roof deck can lead to water leaks, mold, and structural issues over time.
- Prolongs Roof Lifespan: Identifying problems early ensures that your new shingles are installed on a solid foundation, increasing their durability.
- Saves Money: Addressing small issues during the replacement process prevents costly repairs down the line.
Tools and Materials Needed for Inspection
To conduct a proper inspection, gather these essential tools: – Hammer or screwdriver (to test wood integrity) – Flashlight (to check for rot in dark areas) – Measuring tape (for assessing damaged sections) – Pry bar (to remove old materials) – Replacement plywood or sheathing for repairs – Roofing nails or screws – Construction adhesive
Step-by-Step Guide to Inspecting and Repairing Your Roof Deck
- Carefully strip away all shingles using a roofing shovel or pry bar.
- Dispose of debris properly to clear access to the roof decking.
- Look for visible signs of rot, mold, cracks, or holes.
- Check for water stains or dark spots indicating previous leaks.
- Test areas by lightly pressing with a hammer handle or screwdriver; soft spots usually signify rot.
- Ensure existing nails are evenly spaced and properly securing the decking material.
- Remove any loose nails as they may compromise shingle installation.
- Pay special attention to edges where water runoff occurs more frequently.
- Inspect roof valleys thoroughly since they are prone to wear over time.
- Repairing Damaged Sections If damage is detected:
- Cut out rotten or weakened sections using a circular saw.
- Replace these areas with matching-sized plywood or oriented strand board (OSB).
- Use construction adhesive along edges of replacement materials for added stability.
- Fasten repair pieces with galvanized screws or nails every six inches along the edges and every 12 inches in the center.
- Reinforce Joists if Necessary If joists show signs of sagging:
- Install sister joists alongside existing ones for additional support.
- Sweep away any remaining dust, sawdust, or other residue from the inspection process to create a clean surface.
Tips for Preventing Future Roof Deck Issues
- Install underlayment between the decking and shingles for extra moisture protection.
- Ensure proper attic ventilation to prevent moisture buildup that can damage wood over time.
- Schedule regular inspections every few years to catch minor issues before they become major concerns.
Final Thoughts on Roof Deck Maintenance
Taking time to carefully inspect and repair your roof deck ensures that your new shingles have a strong base. This preventative measure not only improves durability but also helps you avoid unnecessary expenses related to structural damage later on. A well-maintained roof deck contributes significantly to an effective roofing system built to withstand various environmental challenges.
Installing Flashing and Ventilation Components to Enhance Roof Durability
Proper installation of flashing and ventilation components is critical for ensuring your roof withstands the test of time. These elements play a pivotal role in preventing water damage, improving energy efficiency, and extending the lifespan of your roofing system. Below, we explore how these components work and provide step-by-step guidance for their installation.
What is Flashing, and Why is it Important?
Flashing consists of thin sheets of metal or other waterproof materials installed around vulnerable areas on your roof where water infiltration is likely.
- Valleys (where two roof sections meet)
Flashing acts as a barrier to direct water away from these critical points, reducing the likelihood of leaks or structural damage.
Types of Flashing
| Type | Application Area | Material Used |
| Step Flashing | Along walls that meet the roof | Aluminum or Galvanized Steel |
| Drip Edge Flashing | Edges of the roof | Aluminum |
| Valley Flashing | Roof valleys | Pre-formed Metal Sheets |
| Chimney Flashing | Around chimneys | Copper or Lead |
Selecting the right type ensures optimal protection for each vulnerable area.
What is Ventilation, and Why Does it Matter?
Proper ventilation regulates airflow in your attic space, preventing moisture buildup and maintaining a balanced temperature.
- Mold growth due to trapped moisture.
- Excessive heat buildup that damages shingles.
- Energy inefficiency as HVAC systems work harder.

Common Roof Ventilation Components
- Ridge Vents: Installed at the peak of the roof to allow hot air to escape.
- Soffit Vents: Placed under eaves to draw fresh air into the attic.
- Gable Vents: Mounted on gable ends for cross ventilation.
- Powered Attic Fans: Electrically operated fans that improve airflow mechanically.
A combination of intake vents (e. g. , soffit vents) and exhaust vents (e. g. , ridge vents) creates an effective airflow system.
Steps to Install Flashing Correctly
- Necessary materials: metal flashing sheets, roofing nails, sealant
- Tools required: hammer, tin snips, caulking gun
- Position each piece at wall intersections with overlapping shingles.
- Secure with nails without puncturing through visible areas.
- Place base flashing around chimneys/skylights.
- Install counter-flashing over base flashing for added protection.
- Apply weatherproof sealant along edges to prevent leaks.
- Ensure everything lies flush against surfaces without gaps.
Steps to Ensure Proper Ventilation Installation
- Calculate attic square footage to determine vent requirements (e. g. , 1 sq ft vent per 300 sq ft attic).
- Cut openings along ridges using a circular saw.
- Position ridge vent caps securely over openings using screws/nails.
- Create evenly spaced slots along eaves underneath overhangs.
- Fit soffit vent covers into prepared slots with screws or clips.
- Perform a smoke test inside the attic (optional) to confirm proper air circulation between intake/exhaust points.
Appropriate installation techniques for flashing and ventilation not only enhance durability but also minimize costly repairs down the line by protecting against common issues like leaks and energy inefficiency during seasonal changes.
Installing Flashing and Ventilation Components to Enhance Roof Durability
Proper installation of flashing and ventilation components is an essential aspect of any roofing project. These elements play a key role in protecting your home from water damage, reducing energy costs, and prolonging the lifespan of your roof. Below is a comprehensive guide to help you understand the importance of these components and how to install them correctly.
The Role of Flashing in Roof Durability
Flashing is a thin material, typically made of galvanized steel or aluminum, designed to direct water away from critical areas on your roof where leaks commonly occur.
- Chimneys
- Skylights
- Roof valleys
- Dormer windows
- Vents and pipes
Without proper flashing, moisture can seep into the underlying structure, leading to mold growth, rot, and structural damage.
Types of Flashing Materials:
| Material | Pros | Cons |
|——————–|———————————————|———————————|
| Aluminum | Lightweight, rust-resistant | Can corrode when in contact with concrete or mortar |
| Galvanized Steel | Durable and cost-effective | May rust over time |
| Copper | Long-lasting and aesthetically pleasing | Expensive |
Steps for Installing Flashing
- Prepare the Surface:Ensure that all surrounding areas are clean and free from debris or dust.
- Measure and Cut:Measure the area requiring flashing and cut it to fit precisely.
- Seal Properly:Apply roofing sealant around edges for added water resistance.
Properly installed flashing serves as a frontline defense against leaks while improving overall roof durability.
The Importance of Ventilation Systems
Ventilation ensures that air circulates properly through your attic space, preventing moisture buildup, regulating temperature extremes, and extending the lifespan of roofing materials.
- Mold can develop due to trapped moisture.
- Roofing shingles may warp or deteriorate prematurely.
- Energy costs may increase due to poor insulation efficiency.
- Ridge Vents– Installed along the peak of the roof for consistent airflow.
- Gable Vents– Located on gable ends for passive circulation.
- Powered Fans– Mechanical systems that actively expel warm air.
Steps for Installing Ventilation Components
- Assess Your Needs:Determine how much ventilation your roof requires based on its size and slope (a general rule is 1 square foot of vent space per 150 square feet of attic area).
- Choose Suitable Locations:Identify optimal spots such as ridges or soffits for maximum airflow efficiency.
- Install Soffit Vents First:Cut openings at designated eaves locations before attaching soffit vents securely with nails or screws.
- Add Ridge Vents Next:Cut a ridge opening along the roof’s peak before installing ridge vents with screws; seal edges with appropriate caulking material.
Both flashing and ventilation are critical components that work together to enhance your roof’s functionality while protecting it from weather-related wear-and-tear over time.
Installing Flashing and Ventilation Components to Enhance Roof Durability
Proper installation of flashing and ventilation components is essential for ensuring a durable and long-lasting roof. These elements play a critical role in protecting your home from water damage, regulating temperature, and maintaining the structural integrity of your roofing system. Below is a detailed overview of their importance, the types available, and key steps to install them effectively.
The Role of Flashing in Roof Durability
Flashing is used to prevent water from seeping into vulnerable areas of your roof, such as valleys, chimneys, vents, and skylights. Without proper flashing, these areas can become susceptible to leaks and water damage.
Common Types of Flashing:
– Step flashing: Installed along wall-roof intersections or where dormers meet the roof.
– Drip edge flashing: Protects the edges of your roof by directing water away from the fascia and into gutters.
– Valley flashing: Used in roof valleys where two different slopes meet.
– Chimney flashing: Specifically designed to seal around chimney bases.
A well-ventilated roof ensures proper airflow in the attic space, which helps regulate temperature and moisture levels. Poor ventilation can lead to problems such as mold growth, structural weakening due to trapped humidity, or even premature shingle deterioration.
Types of Roof Ventilation Systems:
1.Ridge vents– Installed at the peak of a sloped roof to allow warm air to escape.
2.Soffit vents
3.Gable vents– Positioned on gable ends for cross ventilation within attic spaces.
Proper balance between intake (soffit) and exhaust (ridge or gable) vents is crucial for effective performance.
Steps for Installing Flashing
- Preparation:Inspect all vulnerable areas of the roof before installing new shingles or components.
- Cut Pieces:Measure and cut relevant sections of flashing (e. g. , step or valley) to fit precisely into each area.
- Seal with Caulk:Apply waterproof roofing caulk around edges for additional protection against leaks.
Steps for Installing Ventilation Components
- Determine Placement:Identify optimal locations for ridge or soffit vents based on attic layout.
- Cut Openings:Use a reciprocating saw or cutting tool to create openings where needed.
- Install Vents:Secure vents using screws while ensuring they are level with surrounding materials.
- Check Airflow Balance:Ensure there’s an appropriate balance between intake (soffit) and exhaust (ridge/gable).
| Component | Purpose | Key Installation Tip |
| Step Flashing | Prevents leaks near walls/dormers | Overlap pieces by at least 2 inches |
| Ridge Vent | Releases warm air | Install along ridge line evenly |
| Soffit Vent | Draws in cool air | Keep free from insulation blockage |
Properly installing both flashing and ventilation components not only extends your roof’s lifespan but also prevents costly repairs down the line caused by water penetration or inadequate airflow management systems.
- Maximize Efficiency: When a Minneapolis MN Roofer Recommends Replacing Your Roof
- Step-by-Step Guide for Homeowners Hiring a Roofing Contractor Minneapolis MN
- Step Comprehensive Roof Replacement Guide for Homeowners by a Minneapolis MN Roofing Company
- 11 Step Guide to Successfully Replacing Your Roof with Help from a Minneapolis MN Roofer
- Signs That You Need a Roofing Contractor Minneapolis MN for an Urgent Roof Replacement
- Step-by-Step Guide to Roofing Services Minneapolis MN for Homeowners
- When You Need Planning Permission for Roofing Projects: Advice from a Minneapolis MN Roofer